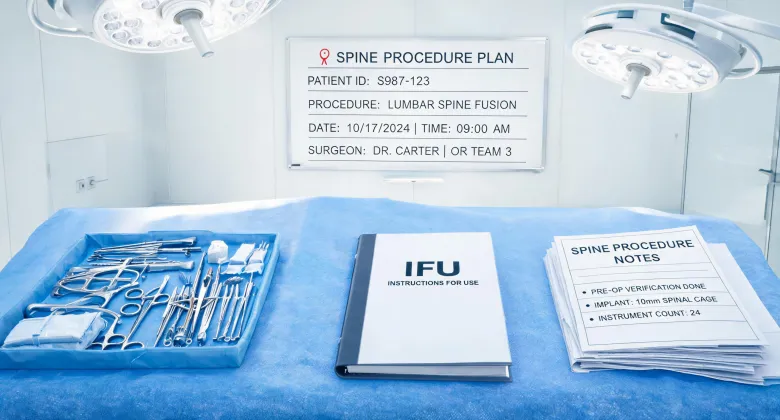
-
When This Checklist Saves You a Revision Surgery
-
Step 1: Confirm You Have the Right Implant System & Technique Guide
-
Step 2: Pre-Check Your Ultrasonic Surgical Aspirator
-
Step 3: Understand What Histology Tells You (and What It Doesn't)
-
Step 4: Prepare Your Electronic Pipette for Intraoperative Cell Sampling
-
Step 5: Verify the Backup Plan for Every Critical Instrument
-
Common Mistakes I Still See (and You Can Avoid)
When This Checklist Saves You a Revision Surgery
I've been coordinating surgical equipment and clinical support for spine teams for about eight years now—maybe nine, I'd have to check my calendar. During that time, I've seen too many cases where a perfectly planned TLIF or ALIF went sideways because of something preventable: a missing instrument, a backup system that wasn't tested, or a tissue sample mishandled for pathology.
This checklist is for you if you're scrubbing in for a minimally invasive spinal fusion tomorrow and want to make sure nothing gets overlooked. It's not a replacement for your own institutional protocols—it's a second set of eyes based on patterns I've observed across about 50+ emergency cases. Let's get into it.
Step 1: Confirm You Have the Right Implant System & Technique Guide
Sounds obvious, right? But I can't tell you how many times I've had a surgeon call me at 10 PM saying the implant they opened doesn't match the planned approach. The biggest culprit? Mixing up TLIF and XLIF rod options.
Here's what you need:
- Printed or digital copy of the NuVasive TLIF surgical technique PDF (or ALIF/XLIF equivalent) in the OR. I keep mine on a laminated sheet taped to the back table. It takes 30 seconds to verify the cage inserter size matches the implant.
- Globus Medical–NuVasive merger details aren't just corporate news—they affect your instrument trays. The combined portfolio means some legacy NuVasive implants are now packaged with Globus instruments. Seriously, verify the compatibility before opening. We had a $2,000 implant wasted last year because the driver didn't fit the new packaging design.
Step 2: Pre-Check Your Ultrasonic Surgical Aspirator
Ultrasonic surgical aspirators (like the Sonopet or newer models) are game-changers for removing soft tissue around the neural elements during TLIF or ACDF. But they're also the most finicky device in the room.
In March 2024, a client called needing a replacement handpiece at 6 AM for a same-day case. Normal turnaround is 2 days. We paid $850 in rush shipping (on top of the $3,200 base cost) and delivered it by 9 AM. The alternative? Cancelling the case—which would have cost the hospital about $18,000 in lost OR time according to our internal estimates.
Checklist for the aspirator:
- Handpiece frequency tested within 24 hours? (Our engineering team says drift happens after 30 sterilization cycles.)
- Irrigation tubing cleared of air bubbles? Seriously, air in the line can cause cavitation inconsistency.
- Backup handpiece and generator available? Not just in the hospital—in the same OR suite.
Step 3: Understand What Histology Tells You (and What It Doesn't)
I'm not a pathologist, so I can't speak to reading slides. What I can tell you from a surgical workflow perspective is this: the tissue you send for histology during a TLIF or ALIF determines whether the patient gets cleared for discharge or needs a biopsy workup.
What is histology? In spine surgery, it's the microscopic examination of removed tissue (disc material, bone fragments, or any suspicious lesion) to rule out infection, tumor, or inflammatory conditions. Sounds straightforward, but here's where things go wrong:
- Wrong transport medium: The specimen needs to be in formalin immediately. I remember a case where the scrub tech put the sample in saline by mistake. By the time the lab received it, cellular detail was compromised—delayed diagnosis by 3 days.
- Insufficient volume: For a PLIF, you might only get a few grams of disc material. But if you're sampling for osteomyelitis, the pathologist needs at least 1-2 cm³ of involved bone. Consult your institution's specimen collection guide beforehand.
I keep a pre-labeled histology container on every TLIF tray—saved us from rushing for one at the last minute twice last year.
Step 4: Prepare Your Electronic Pipette for Intraoperative Cell Sampling
This one's niche, but worth a mention. Some centers now use intraoperative molecular diagnostics to detect infection markers or tumor margins during spinal resections. An electronic pipette (vs. manual) gives you reproducible volumes for PCR or cell culture—critical when you're aspirating just 20-50 µL of fluid from the surgical field.
Don't skip the calibration check. Electronic pipettes drift over time. In my first year, I made the classic rookie error: assumed the lab had calibrated it last week. Cost me a false-negative culture result that delayed the patient's antibiotic start by 12 hours. Now I run a 2-point calibration before every case that requires intraoperative sampling.
I've only worked with centers that use Eppendorf and Rainin models. If you're using a different brand, your calibration steps might differ—check the manufacturer's procedure.
Step 5: Verify the Backup Plan for Every Critical Instrument
This is where prevention really pays off. I know a surgeon who skipped the final review on his cage inserter because 'it's basically the same as last time.' It wasn't. The new batch had a different locking mechanism. That was the one time it mattered. The case was delayed 40 minutes while we sourced a compatible inserter.
For urgent cases, here's my 3-layer backup checklist:
- Redundancy within the tray: Two of each essential instrument (cage holder, rod reducer, screwdriver).
- Redundancy in the hospital: A backup tray or loaner set from the implant rep. Most hospitals now require this per their vendor-access policies.
- Redundancy in the region: Know the nearest hospital or distributor that stocks the same system. In April 2023, we borrowed a $12,000 ultrasonic handpiece from a site 45 minutes away when ours failed mid-case. The hospital paid $800 in courier fees—still cheaper than cancelling.
Common Mistakes I Still See (and You Can Avoid)
- Assuming the 'standard' TLIF technique PDF covers your approach. NuVasive publishes specific guides for different approaches (e.g., paramedian vs. Wiltse). Download the one matching your incision. At least, that's been my experience with the TLIF—the XLIF guide has different retractor blade sizes.
- Overlooking the Globus Medical–NuVasive merger details for instrument compatibility. Some combination instrumentation is still being rolled out. If you're using a legacy NuVasive implant with a Globus driver, test it on the back table first. We had a case where the driver didn't seat fully—caused a 15-minute delay.
- Not having a written backup plan for the histology lab. 'We'll just send it to the main lab' isn't a plan. Know their cut-off times for same-day processing. I keep a card in my scrub pocket with the lab's emergency contact and the formalin volume needed for each sample type.
The 12-point checklist I created after my third mistake has saved us an estimated $8,000 in potential rework over two years. 5 minutes of verification beats 5 days of correction.